High Poly to Low Poly Work Flow

What is High Poly to Low Poly Work Flow?

High Poly to Low Poly work flow is a process that is used to bake a high poly model (desired look of the model) onto a low poly less detailed version of it. The usual process/ the process I think is easier:

  1. Model low poly

  2. UV unwrap it.

  3. Duplicate model and add high poly details,

  4. Modify lowpoly model and its uvmap to fix details to better fit high poly

  5. Render normal map and clean it up in Photoshop.

  6. Render ambiant occlusion map and bake that into the diffuse map.

  7. Paint diffuse map.

An example of this is below:

LP2HP

(Once I get my attempt at setting up a Low Poly and High Poly model to bake I will update my blog with more detail and images)

Matty OUT!


Big Changes For The Secret Room!

As you may have read in my blog about the Low Poly World Project I have been working on many projects including the re texturing and remodeling of the secret room. I call it re texturing but the old secret room was barely textured so let’s just call it texturing. Anyway on with explaining what i have actually done, so first of all one big change that was made in the early days of revisiting my secret room was a reduction of rooms because I had 3 separate rooms one theater, utility and security room. After further thought on what I was going to do first I thought that I should put more into one room rather than my focus to be spread across 3 rooms. So I decided to remove the security and utility rooms and keep the theater because it was what I spent the most time on out of all three rooms. Below is what my secret room looked like before any changes.

adwad

Overall I put most of my focus in on the modelling aspect of the project because it was a modeling project but now with the power of hindsight I wish that I had kept just the theater and put equal amounts of time into modelling and texturing. As you can see at some points I started to texture (Chairs, wooden planked floor, wooden pallet and other things) but that was at the end of the project so I ran out of time and right after the project was over I had forgotten all about it so this is the first time I have revisited it since then. However to make up on lost time I have made a lot of changes and you will see that in the screenshot of the current secret room.

Below is the current secret room:

Room Render.jpg

I really like how the secret room is looking so far and I am looking forward to seeing how it will look in the end when it is all done and textured.

That is all for now with the secret room,

Matty OUT!

Making Games!

Over the last few days I have dedicated the time in and out of college to make games to fill up my portfolio so far I have made a couple of games with the help from tutorials on youtube from Brackeys. The two games that I have made are Doodle Jump and a bomberman type game (which I have yet to add a few things to). I am doing this to further my knowledge in programming because that is what I aspire to do in the future and in industry.

Below is the current version of the doodle jump remake that I made:

gif

The game was fairly easy to make however it taught me some new things that I will use in the future of making games. It also allowed me to learn how to code more fluently in the future. I do not currently have access to the bomberman screenshot/gif because the version that I made it on is broken on the college computers.

However, that is all for now on game making and coding,

Matty OUT!

Industry Job Research!

Programming

Rockstar Leeds

Requirements

  • Mathematics/computer science degree or equivalent.
  • Fluency in C++.
  • Good problem solving and debugging processes.
  • Good code reduction/generalisation skills.

Desirable

  • Experience with peripherals and low-level peripheral IO.
  • Experience with peer to peer networking, low-level network protocols or similar technology.
  • Experience with file IO and error handling.
  • Self-motivated and willing to get involved in wider areas.
  • A passion for and experience of a wider range of technology and games.

Salary:

Competitive


Ubisoft Newcastle

Requirements

• Passionate about playing and making games, and has a good knowledge of the games industry in general;
• Excellent C/C++ programming skills, with excellent knowledge of object oriented development;
• Familiarity with common scheduling, task and issue tracking tools – MS Project, Jira, etc;
• Able to create, manage and track schedules for a team of engineers;
• Self-motivated and pro-active with a strong work ethic;
• Excellent oral and written communication skills;
• Excellent knowledge of common algorithms, data structures and patterns, and the ability to apply them to problems while keeping constraints and performance in mind;
• Knowledge of most areas of game development (physics, AI, gameplay, rendering, online, tools, UI, audio) with expertise in at least 1 area.

Relevant Experience
• Experience with commonly used development tools such as Visual Studio and Perforce;
• Bachelor’s degree in a relevant subject or equivalent industry experience;
• 6 years of commercial software development experience with significant involvement in 2 published games, with at least 1 project at senior level.

Salary:

Competitive


Modelling

Environmental Artist
Rockstar North  (Edinburgh)

  • Superior  2D and 3D art skills.
    – Expertise in 3ds Max, Photoshop and either ZBrush or Mudbox is required.
    – Strong communication and time management skills.
    – Possess a good knowledge of cutting-edge shader techniques.
  • 3DS Max
  • Photoshop
  • Mudbox

Salary:

Competitive


Environment Artist
Ubisoft

  • Strong interpersonal and communication skills;
    – Ability to create interesting, detailed and visually appealing environments;
    – Ability to adapt to new processes and pipelines;
    – Good working knowledge of industry leading 3D modelling packages;
    – Good understanding of composition and visual storytelling;
  • Maya
  • Photoshop
  • Mudbox

Salary:

Competitive


Animation

3D Animator

Outplay Entertainment

  • Strong portfolio demonstrating 3d Modelling and 3d Animation skills (MAYA is our preferred 3d modelling and 3d animation software but alternative software considered)
    Demonstrable flexibility in style ranging from cheerful, cartoon illustration to more detailed, grittier artwork
    Help develop and manage asset pipelines
    Excellent communication and presentation skills
  • Unity
  • Maya

Salary:

Competitive


2D Animator

Scriberia

  • At least 4 years professional animation and idea creation experience.
  • Experience in working as part of a creative team.
  • Experience in directing projects and leading teams.
  • Outstanding communication skills.
  • Stop-frame animation experience
  • Knowledge of DragonFrame and Flash
  • Knowledge of TV Paint
  • Cinema 4D

Salary:

Dependent on experience


VFX

VFX Artist
Playground Games – Warwickshire
  •  An outstanding portfolio demonstrating your particle and VFX work for AAA titles
    This is a fantastic opportunity to join one of the world’s most exciting games studios, using cutting edge technology to create world class games, within a strong, collaborative team.

Programs: 

  •  Max
  •  Maya
  •  XSI
Salary:
Unknown
VFX Artist
  • 2+ years commercial experience in the games industry working on VFX
  • Advanced skills in games software such as Maya & games engines
  • A strong portfolio of VFX work
  • A passion for excellence in VFX creation
  • In-depth knowledge of VFX principles
  • Creative with excellent communication skills
  • Exceptional eye for detail and quality
Programs: 
– Max
– Maya
– XSI
Salary:
£20 – 30k
—————————————————————————————————————————————–

What I Want To Do:

Ideally in the future I would like to work as a programmer/level designer in industry. I am extremely interested in companies that work in the AAA industry like Rockstar, Ubisoft and other AAA developers.
That’s all for now,
Matty OUT!


Turnaround Sheets!

A turnaround sheet is a sheet of paper or an image that has the character in various positions, angles, expressions, most likely front and back views. Below are a couple of examples of turnaround sheets.

Image result for game character turnaround sheet

Image result for game character turnaround sheet

After about half an hour of researching different types and styles of turnaround sheets i decided that I really liked the style above so that is what I decided to base my turnaround sheet on. I really like this style of turnaround sheet because it showcases off everything that is needed to create a 3D model out of it.

[I will post my turnaround sheet when I finish it in the next couple of weeks]

Until then,

Matty OUT!

LowPoly Island So Far!

Over the past few weeks I have been working through my portfolio to polish it for the beginning of next month when it needs to be submitted. I have been working on things like redoing my animations, remodeling and retexturing my secret room, starting to make different games to fill the programming side of my portfolio (Doodle Jump and Fruit Ninja remakes), going over old projects like the bedroom project and modular building project with James. (Blog posts on those will be coming soon)!

However with all of the work that needs to be done for the portfolio there are also current projects that need to be finished and one of those is mine and Luke‘s Low Poly World project. Below is the current version of the Low Poly World which Luke has added a spin script to a camera to get a full orbit of the island so we can put it in a gif to show on our portfolio and on our blogs.

lpw

The Low Poly World is coming along very well in my opinion. The texturing and the sky box are definitely making the island look a lot brighter and more castaway island like. As you can see below this is the current list of what me and Luke have done for the project.

aaa

We are looking to add a few more things before the deadline but for the most part it is finished but it needs a bit of polishing before portfolio and the deadline. We are also doing a collaboration between different islands made by Nath and Bailey, stay tuned for more on that.

However, for now, that is all on the Low Poly World project,

Matty OUT!

SSS Project Final Pieces!

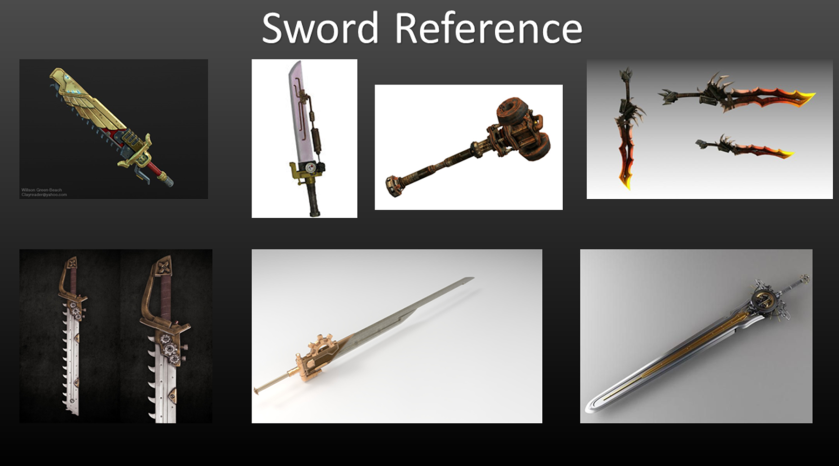
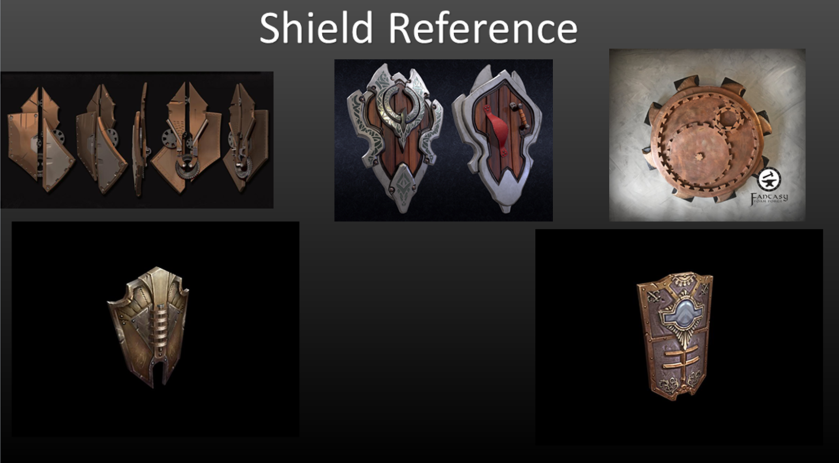
Over the course 3 months we have had to create a stylized shield and sword (SSS) for our portfolio at around June time. Over the whole 3 months of doing this project we have had to plan with moodboards, draw some sketches of things we wanted to create, model, unwrap our models and then texture them. The first thing that was needed at the start of the project was moodboards of pictures that may give inspiration towards the modelling or sketching process. Below are the two moodboards of potential sword and shield ideas.

Sword Reference.png

Shield Reference.png

Then after this I furthered my progression in the project by doing some quick sketches which I would look at very closely to then go and choose which one of the designs that I feel I will be able to model and one that I really like the look of. Here are the sketches that I made for my sword (I did not draw any sketches for my shield).

Sword.PNG

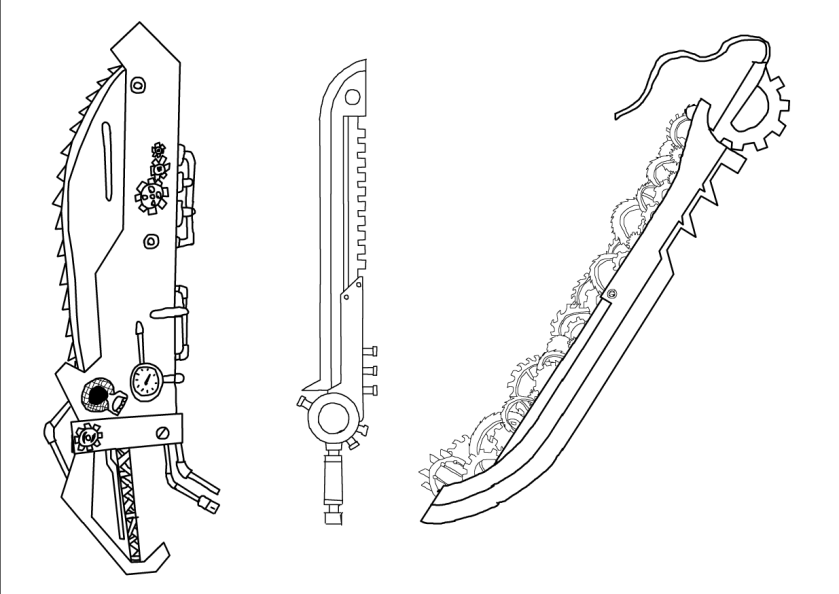
The photos above where really quick and simple drawings that I had some ideas of doing at the top of my head. In the end I decided on doing the one on the far left because I really liked the opportunity to make it very stylised and I also liked all of the random things that are on and around it. I am not saying that I wasn’t satisfied with my final decision but to make a potential better decision I could have looked around more for some stylised swords or I could have even experimented with searching for other types of weapons like axes, scythes or even spear like weapons.

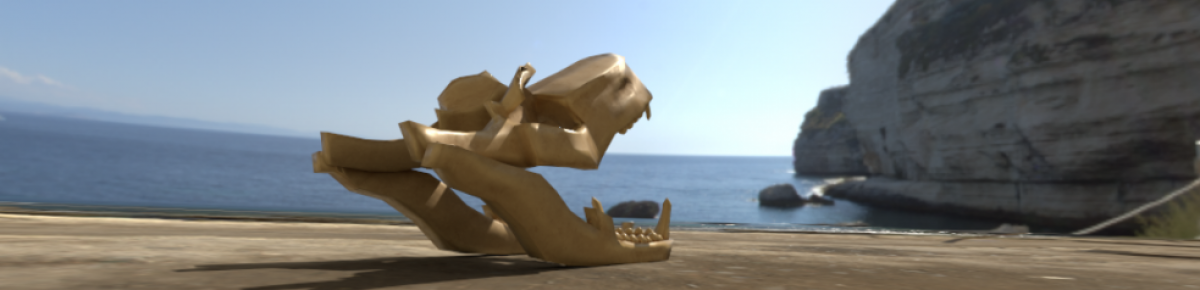
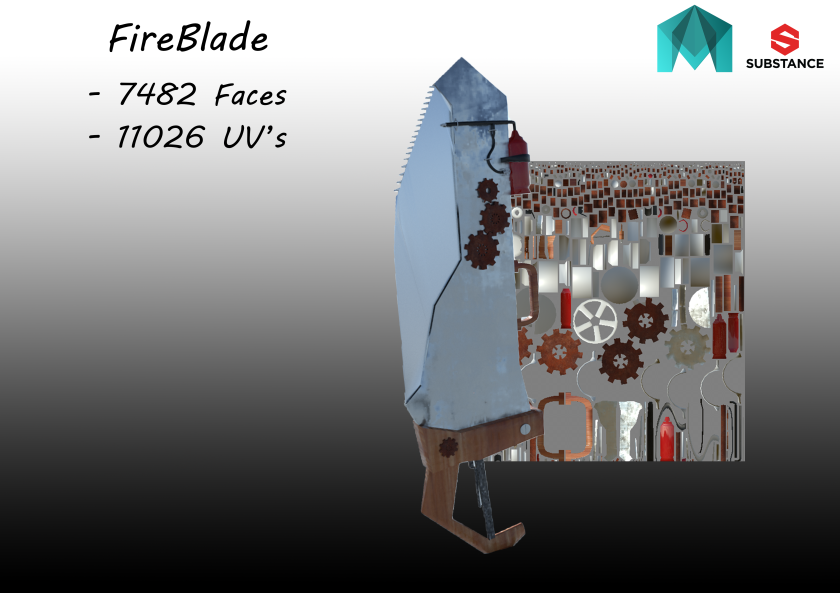
From the concept of the sword that I had chosen (the one on the far right) you can clearly see in the final textured model I had adapted it a very small bit and that is because I felt like I really liked the way the concept art looked from the initial drawing so I decided not to change it much. However, one major change that I made actually determined the name of the sword and that was the addition of the flamethrower on the side of the sword which, when in combat, heats up the blade to deal extra damage to the enemy. In the end the addition of the flamethrower gave the sword the name of the ‘FireBlade’. Below is the final image of my sword model in the SSS Project.

Sword Blog Picture.png

Then there’s the shield that I made with no concept art. The reason that I had not done concept art for it was because I started modelling random things on my computer at home and started to like the shape of a certain model that I had done so I just decided to roll with it and not do any concepts. Below is the finished model of the shield. (You may have seen this at the top of my blog).

Matthew's Blog

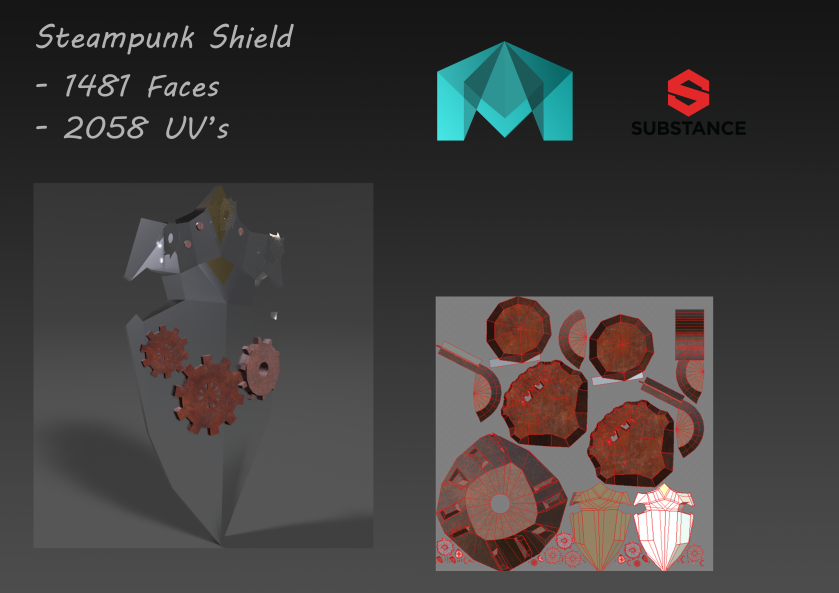
The shield model was made and then I put a steampunk touch to it by adding gears, bolts and gear shaped handles on the back. The shield was really fun to model because along the way of the long processes of modelling, unwrapping and texturing I learned a lot of things that I will undoubtedly use a lot in the future of modelling and texturing. Below is the final fully rendered and textured model of my shield.

Shield Finished

At the end I am both happy and sad to have to end this project. I am happy because it means that I can go on to do more modelling projects (Low Poly Environments) but I am sad because overall it was a very fun and enjoyable project to work on.

That’s it for the SSS Project, It has been fun,

Matty OUT!


Low Poly Environment!

Last week in Ben’s we were introduced to a new modelling project in the form of a low poly environment this new project is there to see how we handle working with restrictions and to train us to work more effectively making sure the tri count isn’t over the limit. This project will definitely test my limits of modelling because I haven’t had to work with restrictions thus far into the course.

Originally the group that we formed consisted of Nath, Luke and Jacob however, Nath decided that he wanted to go solo and Jacob was “Let Go” so now it is just a duo project with me and Luke. We started off with deciding the theme for the environment. The two ideas we came up with were Castaway and Primal, in the end we settled with Castaway. After finding the right theme for us we went straight over to trello to dish out assets to each other and by we I mean all four of us but I will put the current asset list with just me and Luke on.

aw

After we gave each other things to do and settled on a theme the lesson was over and we couldn’t get anything started. Obviously, as you can see, there are completed assets there because me and Luke worked on assets outside of college on the Tuesday and Wednesday in which we were not in. Below you can see all of the assets that I have made.

And here is the current state of the Castaway Island with all of my assets in (currently none of Luke’s assets are in)

lowpoly.png

That’s all for now with the Low Poly Environment,

Matty OUT!

Walk Cycle Finished Product!

Today in Matt’s I finished off the animation and rendering part of my walk cycle. With the animation I animated things that I had not animated yet to make it more smooth e.g. Hands/Fingers and shoulders I really like how it has came along. I then sequence rendered my animation but we were told to cut off the last frame so it is a perfect loop when it becomes a video since the first and the last frame are exactly the same. Here is the current state of my walk cycle (Front and Side) before putting it in blender.


<p><a href=”https://vimeo.com/262470855″>Walk Cycle Front</a> from <a href=”https://vimeo.com/user72252699″>Matthew Dickson</a> on <a href=”https://vimeo.com”>Vimeo</a&gt;.</p>

Currently all I need to do now is to put it into blender, combine the two angles into a video and export it and that will be the end of the walk cycle.

That’s all for now with Animation,

Matty OUT!

(Its time to get funky)

Final Character Design!

Today in Tony’s we were told that we are going to be designing our final character to make with Matt in the future. However, instead of just making any character that may be on our minds we were given a genre/topic to base it on… Symbiosis.

What is Symbiosis?

Symbiosis is the interaction between two different organisms living in close physical association, typically to the advantage of both, also known as a mutualistic relationship. A mutualistic relationship is when two organisms of different species “work together,” each benefiting from the relationship. One example of a mutualistic relationship is that of the oxpecker (a kind of bird) and the rhinoceros or zebra. The oxpeckers get food and the rhinoceros or zebra get pest control.

To make my character I will need to do some research on what exactly I wanted. I instantly thought of something half animal half mech but I thought that instead of that I will just do two animals combined because it makes more sense in the topic of symbiosis.

I loved the idea of having an animal in a turtle shell so that is what I went for in the research process.

Image result for combined animal drawings

Image result for combined animal drawings


I have started to draw a lizard (Komodo Dragon) with a shell on its back. So far I have the shell and the head done and I am looking to get the full character done in the near future.

(I do not currently have the screenshot of the drawing but I will get it up as soon as possible)

That’s all for now with Character Design,

Matty OUT!